

Product information
Description
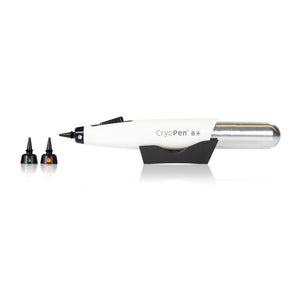
CryoPen B+ for the treatment of plantar warts
Treatment method that uses a fine jet of nitrous oxide under high pressure.
3 applicators included:
- Ø? 1-4mm: power **
- Ø ?? 2-6mm: power ****
- Ø? 4-8mm: power ******
CryoPen guaranteed for 5 years and applicator for 2 years
The manufacturer undertakes to train you via a video call.
This device works on removing your patients' warts without any pain and replaces Vercid which is not always 100% effective.
You can offer your patients a CryoPen package of 2 to 3 sessions with an interval of 7 to 10 days.
Positioning the CryoPen instrument for treatment
The instrument should be held vertically with the tip pointing downward. An angle less than 45° should be avoided.
Effective application
Before starting treatment, consider the age, location, size and number of lesions, skin type, degree of tanning and season.
The tip of the applicator (where the liquefied N?O comes from) should be kept at a distance of 0.5 to 3 mm from the lesion. A distance greater than 5 mm between the lesion and the tip of the applicator will result in liquid N?O transitioning into the gaseous state, making it ineffective in terms of therapeutic results.
By approaching the flow to the lesion, you can observe the focal point of the jet on the tissue. The closer you get to the lesion, the greater the cryogenic power applied to the tissue. For smaller lesions and more delicate operations, we recommend increasing the distance.
Control the quantity of liquid N?O to be applied by quickly moving the applicator back and forth.
Circular and crossed movements have the same effect.
Condensation of moisture in the air can, in certain cases, cause ice to form on the lesion.
This “ice igloo” will hinder the efficient operation of the liquid phase of the cryogen (at -89°C) and must be removed.
The learning curve for using the CryoPen is short. CryoPen allows you to have total control when applying cryogen. Start by treating common lesions and, as you gain experience, move on to more delicate lesions.
Duration/depth of treatment
Hold the tip of the applicator as close to the lesion as possible.
A typical freeze for viral lesions can take 5 to 10 seconds for small, flat warts and up to 45 seconds for plantar warts of maximum thickness.
For most lesions, the treatment time is between 2 and 30 seconds.
This duration depends on the surface and thickness of the treated fabric. To estimate the thickness, the practitioner must rely on his clinical experience. After the first freezing cycle, allow the tissue to thaw for approximately 30 seconds, followed by a second cryogenics.
Note that during this second cycle, the tissue will freeze faster than during the first cycle. This “freeze-thaw-freeze” technique offers the best chance of success. You will find this procedure in most scientific articles on cryotherapy.
A follow-up visit is recommended after 2 to 4 weeks, to confirm the disappearance of all pathological tissue and to verify whether or not follow-up treatment is necessary.
The user manual is available in the "attachments" tab above??
.png)
Use of the instrument:
Step 1 : Loading a new cartridge
Cartridges are packaged in peel-apart blister packs with an assembled filter/perforator. The filters are used for the protection of the applicator, the perforator to pierce the cartridge.
CryoPen Check the cavity for any remaining items.
Open the peel-off packaging. Take out the filter/perforator with the tweezers. Hold the tip of the CryoPen pointing downward. Place the filter/perforator into the instrument making sure it is flat at the bottom of the loading cavity.
The perforator trocar must point upwards! Take the cartridge and insert it into the cavity, narrow side down, above the filter/perforator.
Step 2: Puncture the unused cartridge
Carefully screw the posterior end of the CryoPen onto the anterior end.
Proceed until you feel that contact is established between the filter/perforator block and the cartridge. Then position your hands so as to perform a final rotation movement without interruption. Then turn quickly until you reach the stop.
You may hear a brief hissing sound.
The briefer it is, the better!
Extracting the used cartridge and emptying the cavity
Before loading a new cartridge, first release all residual gas from the cartridge by unscrewing the applicator and then pressing the trigger. Then unscrew the rear end. Discard the used cartridge and filter/perforator.
Concerning the CryoPen X+ and CryoPen XP instruments, be careful not to throw away the 16/8 g converter.
Make sure that the filter/perforator used does not remain in the cavity. The cavity should no longer contain any element.
Step 3: Using your CryoPen
Remove the applicator cap. Gently press the trigger to start the flow of N?O. Release the trigger to stop the flow of cryogenic liquid.
1 or 2 seconds after releasing the trigger, the gas remaining in the applicator is released.
One cartridge can be used for multiple treatments and patients.
Important notes:
- Be sure to only use cartridges and filters/perforators supplied by H&O Equipments nv/sa. Any other cartridge and filter/perforator will damage the instrument.
- Incorrect positioning of the filter/perforator device in the loading cavity will cause irreversible damage to the instrument.
- Residual foreign matter present in the loading cavity when inserting a new filter/perforator may cause instrument failure.
- The loaded instrument is under high pressure. Any modification to the structure of the instrument may result in a potential risk.
- Never obstruct the gas expulsion opening with your hand, at the end of the rear part, when removing the cartridge!
- The cartridges must be kept away from heat (max 50°C/122°F). Leave the applicator cap on when not in use.
- CryoPen instruments are reserved exclusively for professional use.
- N2 O cartridges contain both a liquid phase and a gas phase in equilibrium. The proportion of each of these phases depends on the ambient temperature and influences the flow rate at the outlet. Best performance is achieved when the cartridge temperature is between 19°C and 22°C. Lower or higher temperatures will give different values of pressure and density of the cryogenic substance. Above 25°C, the quantity of liquefied N2 O in the CryoPen jet will decrease.
- Empty cartridges should be thrown away with metal waste.
Description
CryoPen B+ for the treatment of plantar warts
Treatment method that uses a fine jet of nitrous oxide under high pressure.
3 applicators included:
- Ø? 1-4mm: power **
- Ø ?? 2-6mm: power ****
- Ø? 4-8mm: power ******
CryoPen guaranteed for 5 years and applicator for 2 years
The manufacturer undertakes to train you via a video call.
This device works on removing your patients' warts without any pain and replaces Vercid which is not always 100% effective.
You can offer your patients a CryoPen package of 2 to 3 sessions with an interval of 7 to 10 days.
Positioning the CryoPen instrument for treatment
The instrument should be held vertically with the tip pointing downward. An angle less than 45° should be avoided.
Effective application
Before starting treatment, consider the age, location, size and number of lesions, skin type, degree of tanning and season.
The tip of the applicator (where the liquefied N?O comes from) should be kept at a distance of 0.5 to 3 mm from the lesion. A distance greater than 5 mm between the lesion and the tip of the applicator will result in liquid N?O transitioning into the gaseous state, making it ineffective in terms of therapeutic results.
By approaching the flow to the lesion, you can observe the focal point of the jet on the tissue. The closer you get to the lesion, the greater the cryogenic power applied to the tissue. For smaller lesions and more delicate operations, we recommend increasing the distance.
Control the quantity of liquid N?O to be applied by quickly moving the applicator back and forth.
Circular and crossed movements have the same effect.
Condensation of moisture in the air can, in certain cases, cause ice to form on the lesion.
This “ice igloo” will hinder the efficient operation of the liquid phase of the cryogen (at -89°C) and must be removed.
The learning curve for using the CryoPen is short. CryoPen allows you to have total control when applying cryogen. Start by treating common lesions and, as you gain experience, move on to more delicate lesions.
Duration/depth of treatment
Hold the tip of the applicator as close to the lesion as possible.
A typical freeze for viral lesions can take 5 to 10 seconds for small, flat warts and up to 45 seconds for plantar warts of maximum thickness.
For most lesions, the treatment time is between 2 and 30 seconds.
This duration depends on the surface and thickness of the treated fabric. To estimate the thickness, the practitioner must rely on his clinical experience. After the first freezing cycle, allow the tissue to thaw for approximately 30 seconds, followed by a second cryogenics.
Note that during this second cycle, the tissue will freeze faster than during the first cycle. This “freeze-thaw-freeze” technique offers the best chance of success. You will find this procedure in most scientific articles on cryotherapy.
A follow-up visit is recommended after 2 to 4 weeks, to confirm the disappearance of all pathological tissue and to verify whether or not follow-up treatment is necessary.
The user manual is available in the "attachments" tab above??
Use of the instrument:
Step 1 : Loading a new cartridge
Cartridges are packaged in peel-apart blister packs with an assembled filter/perforator. The filters are used for the protection of the applicator, the perforator to pierce the cartridge.
CryoPen Check the cavity for any remaining items.
Open the peel-off packaging. Take out the filter/perforator with the tweezers. Hold the tip of the CryoPen pointing downward. Place the filter/perforator into the instrument making sure it is flat at the bottom of the loading cavity.
The perforator trocar must point upwards! Take the cartridge and insert it into the cavity, narrow side down, above the filter/perforator.
Step 2: Puncture the unused cartridge
Carefully screw the posterior end of the CryoPen onto the anterior end.
Proceed until you feel that contact is established between the filter/perforator block and the cartridge. Then position your hands so as to perform a final rotation movement without interruption. Then turn quickly until you reach the stop.
You may hear a brief hissing sound.
The briefer it is, the better!
Extracting the used cartridge and emptying the cavity
Before loading a new cartridge, first release all residual gas from the cartridge by unscrewing the applicator and then pressing the trigger. Then unscrew the rear end. Discard the used cartridge and filter/perforator.
Concerning the CryoPen X+ and CryoPen XP instruments, be careful not to throw away the 16/8 g converter.
Make sure that the filter/perforator used does not remain in the cavity. The cavity should no longer contain any element.
Step 3: Using your CryoPen
Remove the applicator cap. Gently press the trigger to start the flow of N?O. Release the trigger to stop the flow of cryogenic liquid.
1 or 2 seconds after releasing the trigger, the gas remaining in the applicator is released.
One cartridge can be used for multiple treatments and patients.
Important notes:
- Be sure to only use cartridges and filters/perforators supplied by H&O Equipments nv/sa. Any other cartridge and filter/perforator will damage the instrument.
- Incorrect positioning of the filter/perforator device in the loading cavity will cause irreversible damage to the instrument.
- Residual foreign matter present in the loading cavity when inserting a new filter/perforator may cause instrument failure.
- The loaded instrument is under high pressure. Any modification to the structure of the instrument may result in a potential risk.
- Never obstruct the gas expulsion opening with your hand, at the end of the rear part, when removing the cartridge!
- The cartridges must be kept away from heat (max 50°C/122°F). Leave the applicator cap on when not in use.
- CryoPen instruments are reserved exclusively for professional use.
- N2 O cartridges contain both a liquid phase and a gas phase in equilibrium. The proportion of each of these phases depends on the ambient temperature and influences the flow rate at the outlet. Best performance is achieved when the cartridge temperature is between 19°C and 22°C. Lower or higher temperatures will give different values of pressure and density of the cryogenic substance. Above 25°C, the quantity of liquefied N2 O in the CryoPen jet will decrease.
- Empty cartridges should be thrown away with metal waste.
Marque :
CryoPen
|
Référence :
554.001
CryoPen B+ - Treatment of warts

In short
Le CryoPen B+ est conçu pour recevoir nos plus grosses cartouches de : 23,5 g.Ce qui le rend idéa...
Read more
- Regular price
- 2.406,25€
- Sale price
- 2.406,25€
- Regular price
-
3.368,74€
Tax included.
Shipping calculated at checkout.

Réapprovisionnement en cours – réservez dès maintenant !
Real-time stock status in our warehouse
The stock displayed may vary slightly from reality due to update times of up to 5 minutes.
Stocks are displayed on an indicative and non-contractual basis.
Disponibilité : actualisez la page une fois la variante sélectionnée pour mettre à jour la disponibilité

Secure Payment: Visa, MasterCard, Amex, Apple Pay

Free delivery from 100€ purchase including tax

Delivery to your office, to a relay point or to your home!
Couldn't load pickup availability
Référence My Podologie : Translation missing: en.products.product.sku:554.001
EAN : 1540700848020
Garantie : 5 years
Caractéristiques : Non spécifiées
Mentions particulières : Photos non contractuelles
CryoPen B+ - Treatment of warts
- Regular price
- 2.406,25€
- Sale price
- 2.406,25€
- Regular price
-
3.368,74€
Tax included.
Shipping calculated at checkout.
Disponibilité : actualisez la page une fois la variante sélectionnée pour mettre à jour la disponibilité
Référence My Podologie : Translation missing: en.products.product.sku:554.001
EAN : 1540700848020
Garantie : 5 years
Caractéristiques : Non spécifiées
Mentions particulières : Photos non contractuelles


